LR028 - Sharing LrC Collections on the web with feedbackLR028 (V01) – Sharing LrC Collections with User Feedback Document change logV01 – LrC/14.4 - 2025-11-07 Table of contentsMake the collection visible to others Seeing ‘Likes’ and ‘Comments’ in LrC
IntroductionThere are many ways to share images online including photo sharing sites such as
Many of these solutions allow viewers to rate, like, and comment on individual images. And, in some cases if you’ve used a Lightroom Classic Publish Service, those ratings, likes, and comments can flow back into LrC as new metadata attached to the image. This blog is about using the “Make Public” feature in LrC (Lightroom Classic), or “Share” feature in LR/Cloud for this purpose.
Basic ConceptMany photographers have asked if there is a way to allow clients to see sets of images and let them provide comments on or approval of images. One group that uses this concept quite heavily are family and wedding photographers who want their clients to look through “proof” images to select the ones they want included in the photo package they will receive. However, this can also be used by non professionals. One example from my own experience is that after scanning tons of slides/prints/negatives from recently departed relatives in most cases I have no idea who is shown in the images or when/where they might have been taken. But, other family members may recall such things and having a way to get the images to them and get their comments back is quite useful. There is a free way to do this with your current Adobe plan and it is not all that difficult. It is basically a 4 step process
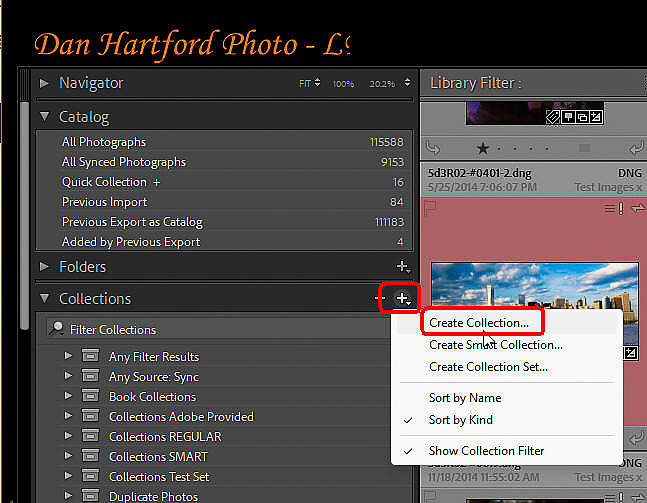
Here’s how to do this from LrC: Select the imagesThe first step is to select the images you want to send out for view (and comment). This is done by placing those images into a Collection in LrC or Album in LR/Cloud. In LrC, in the left panel group of the Library module click the “+” on the “Collections” panel header and select “Create Collection”. Give the collection a name and click the “Create” button. Now drag the images into this collection.
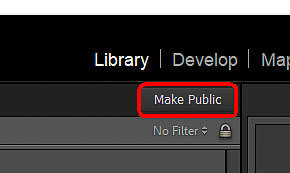
Make the collection visible to othersNow we need to make this collection visible outside of your Adobe account as a web page. Right click on the collection name and select “Sync with Lightroom”. This will create an Album in LR/Cloud with the selected images included. After the sync process finishes you can check the results using any of the LR/Cloud Apps. I use LR/Desktop for this. Now, in LrC click the “Make Public” button (top right of the grid) or in any of the LR/Cloud apps “Share” the album.
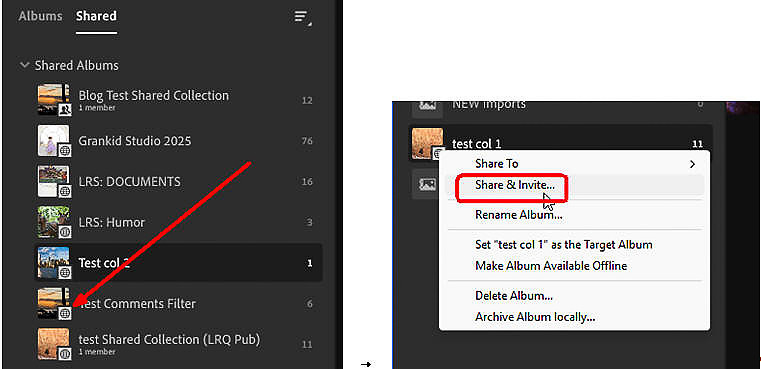
This creates a web page for those images and provides you with the URL for that page. The URL will appear just to the left of where the “Make Public” button was but now that button says “Make Private”. You will initially see a full URL there but it will shortly change to a short URL. You can click on this URL to open the image in your default browser or you can right click (ctrl click on Mac) on the URL to copy the URL to your clipboard for pasting into another app like an email message. Share & InviteBy default anyone who you give this URL to will have view access to this group of images. If that is all you need, then you are done other than letting folks know the URL. But if you want them to be able to “like” or “comment” on images go to a LR/Cloud app. The one I use is Lr/Desktop (LR/D) which also runs on my desktop computer and can be installed from the Adobe Creative Cloud app. The rest of these instructions are shown for the Lr/D app but other LR/Cloud apps have the same tools. Open Lr/D and in the left panel navigate to the Album created from the Lr/C collection Notice the little “graphic world” icon tucked in at the bottom right of the album icon? This denotes that this album has a URL and is shared. Right click on the icon for this album and select “Share & Invite”.
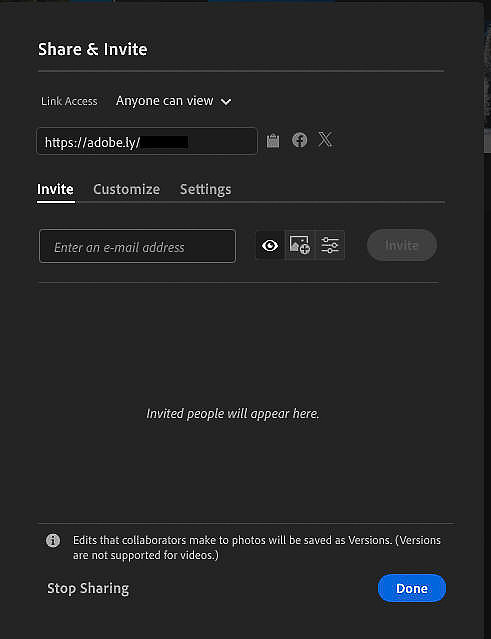
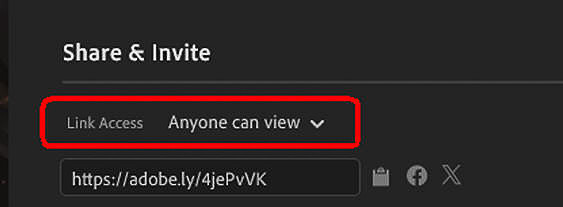
This brings up the “Share & Invite” dialog box
Let’s start at the top of this dialog box. The first item is “Link Access”. With this pull down you decide who can use the URL and see the shared webpage.
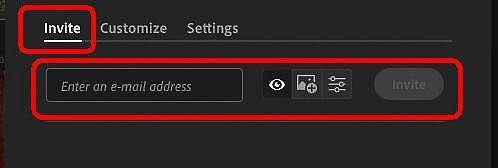
If you pick “Anyone can view”, then anyone with the URL has access to view the images even without being logged into, an Adobe account. They will be able to view the images and if permitted in the “Settings” tab (see below) will be able to download images. However, the viewer cannot add their own images, issue “likes” or provide “comments” unless they are logged in with an Adobe Account and then only within the permissions granted in the “Settings” tab (see below). If you select “Invite Only” then only people whose email address you provide will have access to even view the album and will need to be logged into an Adobe account with that email address. In addition to the defaults you set in the “Settings” tab you can individually control other privileges by user. On the line with the URL, the first icon (clipboard) copies the URL to your system clipboard for pasting into other apps such as an email. The other two icons are to share the link to your linked Facebook account or your linked X account. Below the URL line are three tabs; Invite, Customize, and Settings. Invite People Tab
This is where you invite specific people to the shared Collection/Album. You can invite individuals whether you selected “Invite Only” or “Anyone can view”. The invited people will have the permissions set in the “Settings” tab and can be given additional permissions using the icons on the same line as their email address. You invite people by providing their email address. When you do this the system sends them an email telling them that they have been invited to the album. You can invite any email address you desire but in order for them to provide any updates to your images they will need to be logged in to an Adobe account with that email address. This doesn’t mean that they have to have purchased a plan or have any Adobe products, just that they have created an Adobe account (free) with that email address. The web page for the album will ask them to either log in or create an Adobe account if they attempt to perform an update action. For each invited person you can give permissions beyond those specified in the “Settings” tab. Type in an email address and then pick an icon:
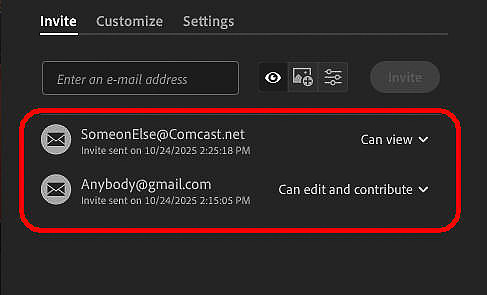
After typing in the email address and picking one of the permissions icons, click the “Invite” button on the same line to save the email address and settings for that person. When you click “Invite” it will automatically send an email to that person with the URL and will add that person to the list of invited folks below.
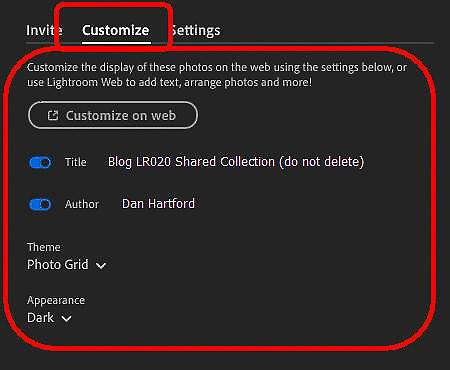
From this list of people you can use the pull down arrow at the far right of any of the invited people to change their individual permissions. Customize TabThe Customize tab controls a few aspects of what the web page will look like. If you click the “customize on web” button you will get a few more (but not many) options for how the page will be displayed.
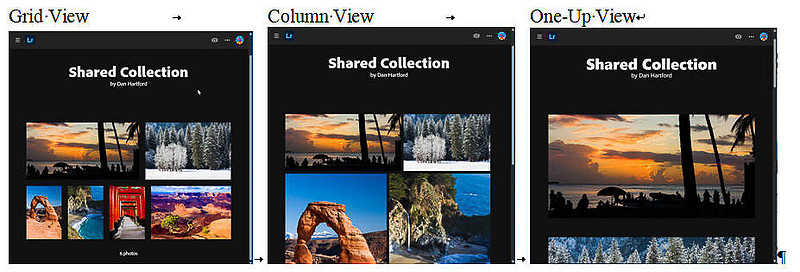
With this tab you can show or not show the name of the Collection/Album as the title of the page and you can supply an author name (type in the box) and decide to show or not show it as well. In the “Theme/Photo Grid” you can choose from displaying the images in a grid, columns, or one-up (single column).
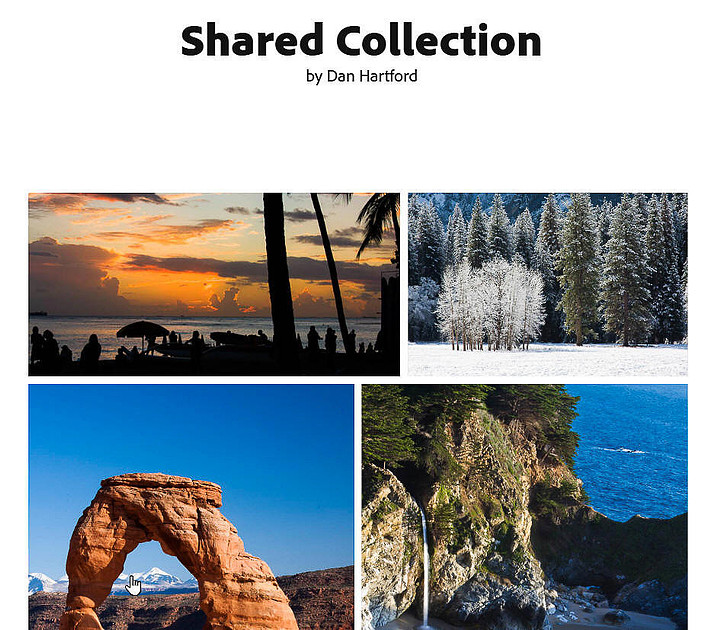
You also have a choice between “Dark” (as shown above) or “Light” (as shown below).
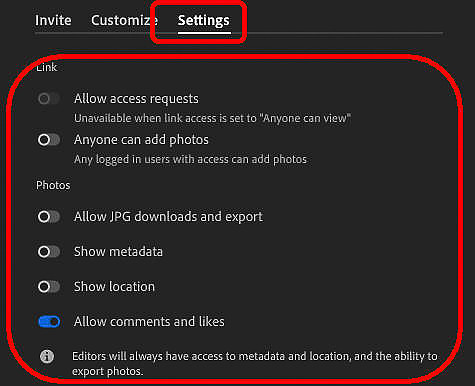
Settings Tab
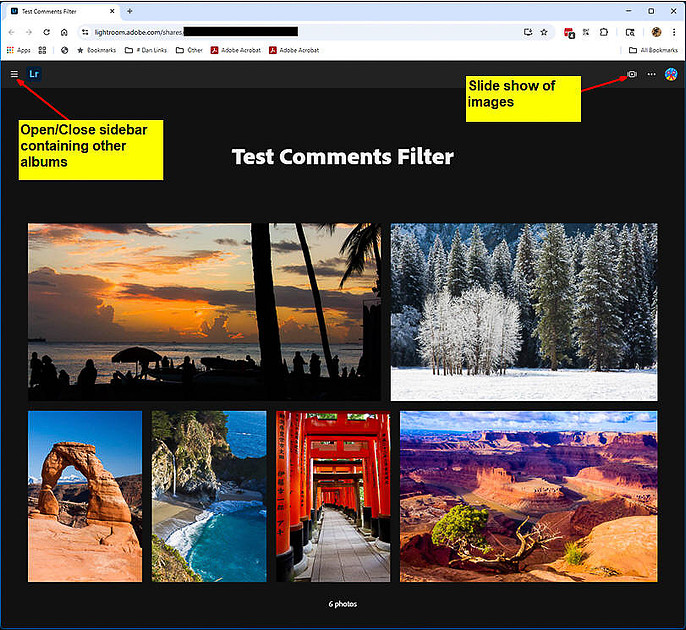
The Settings tab provides the default permissions for that album (what un-logged in viewers will have) and has several switches to show or hide various types of metadata. These should be self evident by the text next to each on/off switch. If the viewer is logged into an adobe account whose email address was “invited” they will also have the permissions associated with their invite. Using the Web PageIf you used “Anyone can view” then it is just as it says. Put the URL into a browser and you will see the web page with the images. However, if you selected “Invite Only” you must be logged into an Adobe account whose email address was “invited”. In either case, in order to provide comments or likes, you will need to be logged in to an Adobe Account. When you go to the web page this is what the screen will look like
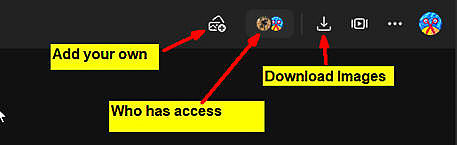
If you have been given various update permissions, you will see additional icons in the upper right
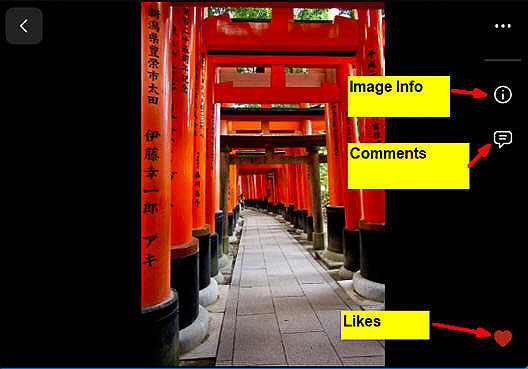
Click on an image to go into Loupe view (single image view) with that image. Depending on your permissions, you may see some icons down the right side.
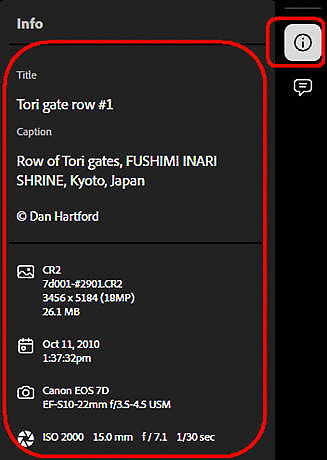
The Image Info icon will display a bit of metadata for the image (depending on “settings” tab). Here is an example of what shows
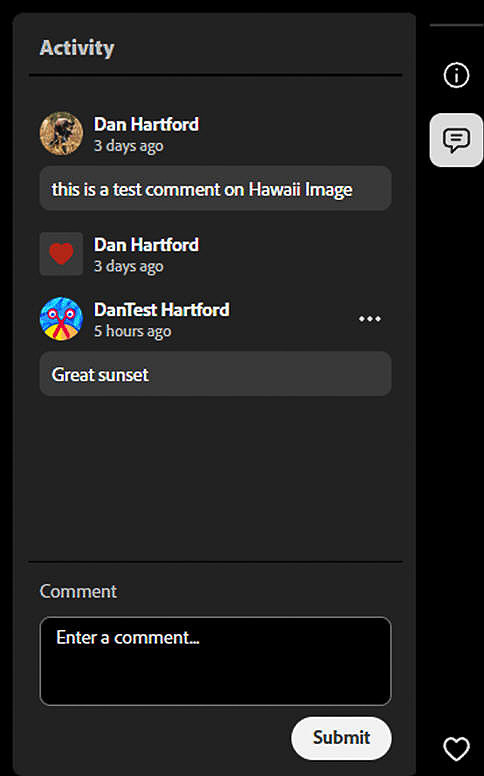
The “Comments” icon (they call “Activity”) opens a panel showing existing comments and likes along with a place to add your own (if you have permission to do so)
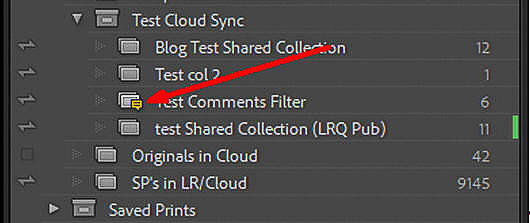
And, the bottom heart icon is the “Like” button. Click to toggle your “like” setting. When done commenting and/or liking/unliking, click the “Submit” button to save your changes. When you click “Submit”, your changes from this web page will first be sent to the Adobe Cloud. Once in the Adobe cloud, Lr/Cloud apps will have access to that data and next time you have LrC open with cloud sync turned on, the new data will be copied down to LrC. Seeing ‘Likes’ and ‘Comments’ in LrCThe first thing to notice is that when new comments or likes have arrived, the collection icon in the Collection Panel gets a little orange “Activity” badge letting you know that there are new comments or likes. But, once you open that collection, that badge goes away.
Likewise, when you open a collection with likes or comments, you’ll see an ”activity” badge on the images with comments or likes in the grid. Initially the badge for an image that has a new like or comment will be orange, but after a few seconds it turns gray.
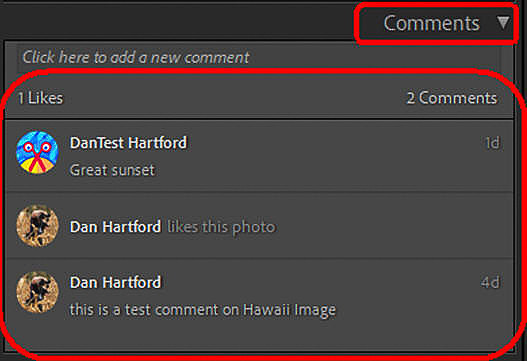
You will be able to see the comments for the active photo in the “Comments” panel, which is the last one on the right side in the Library module.
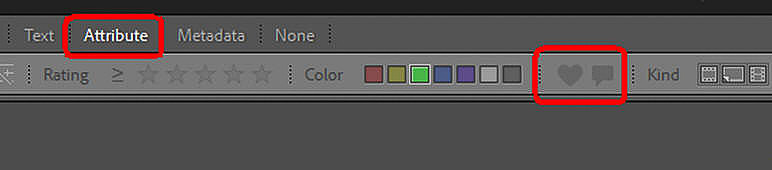
Filter for Likes and CommentsAs of LrC/15.0, you can filter for likes or comments using the Attribute filter
If you have just the “heart” icon (likes) turned on you see all the liked images. If you have just the “thought bubble“ icon (comments) filter turned on you will all the images that have comments. However, if you have both turned on, then you will only see images that have both a like and a comment. Final CommentYou’ve made it to the end of this article. I hope you found it informative and useful and that it addressed whatever it was that led you here. If you’ve stumbled upon any errors, omissions, or things that could be presented better, please let me know by leaving a comment. You will notice as you read through this article that you were not required to logon or to create an account. I did not ask for your credit card number. You did not have to provide an email address or phone number. You were not bombarded with pop up ads. I did not lure you part way into the article and then tell you to pay for a subscription to get the rest. Nobody paid me to write this article. I have no sponsors. I have no advertisers. I spend a lot of time researching, testing, and writing articles such as this one to help folks such as yourself and to attract people to my web site where they may be inclined to utilize my one-on-one Lightroom Classic Training or Lighroom Help consulting services. So, I am going to ask you for a favor. Please spend 5 minutes and leave a thoughtful comment. That’s it! If you feel especially motivated, post a review on Google and/or Yelp for “Dan Hartford Photo”. Free to you, very helpful to me. To leave a comment without having to register, send it to me via the "Contact+About" menu and I'll post it for you (include the blog number or name).
Keywords:
Client image comment,
Client image selection,
Client input,
Comments,
danlrblog,
image feedback,
lightroom,
lightroom classic,
Likes,
LR,
LR/Cloud,
LrC,
Make Collection Public,
Make public,
proof images for client,
Share,
Share Album,
Share Collection
Comments
No comments posted.
Loading...
|