LR031 - 15 Things New LrC Users Should KnowLR031 (V01) – 15 Things New LrC Users should know Version History
Contents 1 - Lightroom vs. Lightroom Classic 2 - Understanding the LrC Catalog 3 - LrC does not contain your images 5 - Drive Letter Change (Windows) 7 - Images must be imported first 8 - Folders not showing in Folders Panel 9 - Image counts are wrong in Folder Panel
Introduction
Lightroom Classic (LrC from now on) is a very powerful image management and image editing tool. It has many, many tools, features and capabilities (and more coming all the time). You can learn how to use LrC as you go or all at once through a class, a private tutor, reading blogs, watching Internet video’s or just experimenting and asking Google questions from time to time. But, there are some things that routinely trip up a large number of new users and wind up causing problems (some quite serious) down the road. This is even true for new users who are very computer literate – and even developers themselves. And it is especially so for those who learn by experimentation and perhaps hitting the ‘help’ button from time to time. This article is not intended to teach you LrC. Rather it is intended to point out 15 of the most common things that new users get tripped up on and later on wish someone had told them. 1 - Lightroom vs. Lightroom ClassicNew users many times install the wrong Lightroom product on their computer. Usually they seek the more full featured and more powerful LrC (Lightroom/Classic) and instead download and install Lightroom LR (Lightroom/Cloud). Even though they are both in the same “image management and editing” space, they are distinct and different products. Over the years, what we now call Lightroom and Lightroom Classic have undergone many iterations and name changes. To be honest it seems that many of those changes were designed to be as confusing as possible. For some history and more information about this, see LR CLASSIC vs LR CC. These poor naming decisions are still tripping up users today. Many first time users wind up installing the wrong version on their PC or Mac. Lightroom Classic (LrC)
This refers to Lightroom Classic (LrC) and is a desktop program that runs on Mac’s and PC’s and your images remain in your control on your computer. This is sometimes referred to as the “catalog based version” or the “folder based” version of Lightroom. Lightroom (Lr)
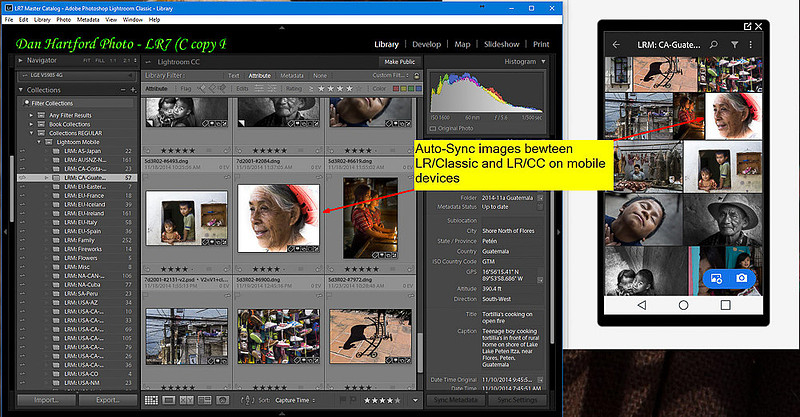
This refers to Lightroom which is a suite of apps which run on Apple and Android mobile devices, PC’s, Mac’s and through a Web Browser. In this case, Adobe stores your original images on its own servers and you access/manage/edit those images through one or more of the apps. Any changes you make in any of the apps are then available through all the apps. This ecosystem is often referred to as “Lightroom/Cloud”. For more info on the two ecosystems see: LR CLASSIC vs LR CC There is a synchronization process for images between the two ecosystems which can be used. If used, most changes you make in one of the eco systems syncs to the other ecosystem. For more info on synching images between LrC and LR/Cloud see: Use LR/classic and LR/Cloud Together On The Same Images
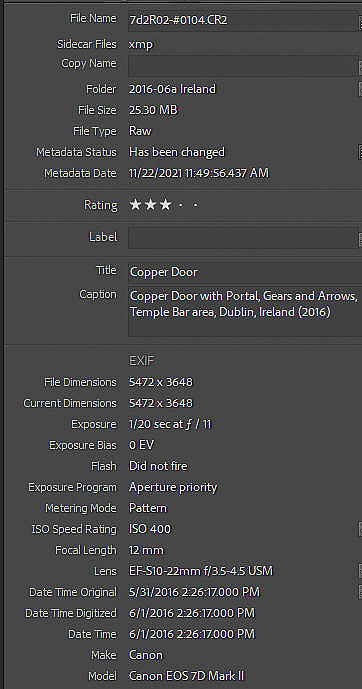
When you choose an Adobe Plan and/or download and install the software make sure that you pick the correct product. This article is strictly for LrC and has no relationship to LR/Cloud 2 - Understanding the LrC CatalogLrC is designed to manage and edit your images. It keeps a list of images it has been made aware of in a large set of files collectively called the “the Catalog”. The main file (also referred to as the “the Catalog”) is a SQLite database which can be thought of like a giant spreadsheet on steroids. A Simple analogy is that there is one row in this ‘spreadsheet’ for each image that LrC knows about. The columns contain all the information ABOUT the image but not the actual image itself. For example it contains information provided by the camera like date, time, camera make/model/serial number, lens name/focal length, exposure, Etc.). There are also columns for additional information you add such as title, caption, rating, copyright info, keywords, model and job information, etc. In fact there are 200 to 300 pieces of data associated with each image – BUT NOT THE IMAGE ITSELF. Another way to think about it is like a card catalog in an old public library. In the public library there was a card catalog, where each card tells you ABOUT a book with information such as title, author, publisher, genre, and publish date among other things and may also contain a little picture of the book cover. Among this data is information telling you where to find the book on the shelves. But the card does not contain the text of the book itself. Example of some of the information kept in the catalog about each image
By keeping information about each photo in the catalog, Lightroom can access the information very quickly and use information from multiple images simultaneously – even when the underlying photos are in different folders and even on different disk drives. Photos are added to the catalog through the “Import” process. As such you may have many images on your computer system that LrC does not know about as they have not been imported. This is quite normal but a best practice is to establish an LrC Master Photos folder which will contain subfolders which in turn will contain all the images LrC knows about.
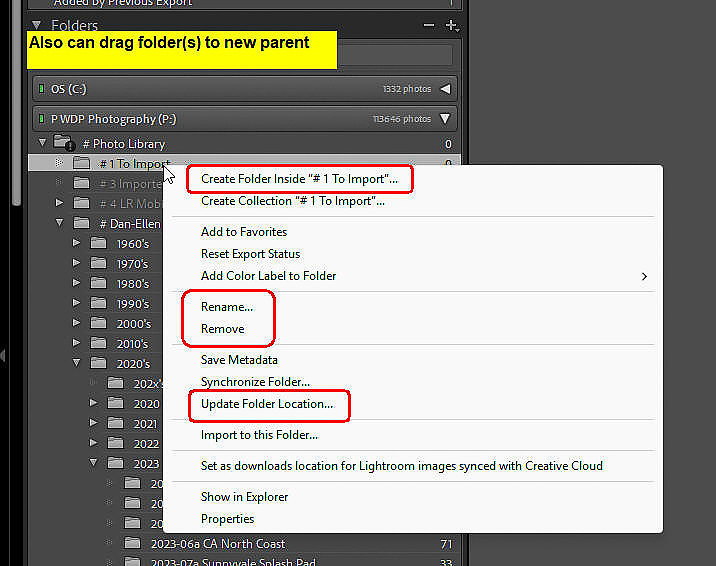
3 - LrC does not contain your imagesAs mentioned above, the catalog does not contain your image files. One of the pieces of information saved in the catalog is a pointer to the actual image on disk. This includes the entire path starting with the drive letter (Windows) or drive name (Mac) all the way down to the file name of the image. Why is this important? If you change anything related to this entire path to the image outside of LrC (say, with Mac Finder or Windows File Explorer), LrC will no longer be able to find the folder or the image and one or both will be marked as “missing”. This is not a good thing. However, if you use the Folders Panel in LrC’s Library Module to make those changes instead of something outside of LrC, then LrC updates the catalog at the same time it makes the physical change on disk and that keeps everything intact. From the LrC Folders Panel, you can rename, move, copy, remove (from the catalog but leave on disk) or delete (remove from catalog and delete form disk) for both folders and images.
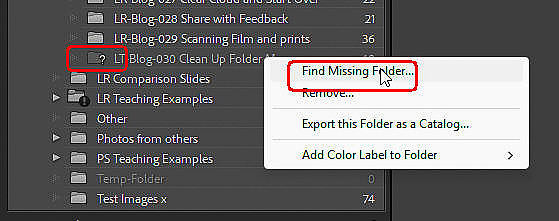
If you need to move hundreds of folders or thousands of images (e.g. to a larger hard drive), you ‘can’ do this using Finder/Explorer and then re-link those folders in LrC, but please assure you know the proper procedure before you start. If done properly it’s a simple quick process to re-link the whole set but if not done properly you can wind up having to re-link hundreds or thousands of folders one by one manually. So, look before you leap. But, you (like most of us) will from time to time forget and do something in Finder/Explorer that you should have done in LrC. If a Folder goes ‘missing” in LrC (and it will) you will see a “?” on the folder icon in the Folders panel (and all of its parent folders will have a white “!” in a black circle). Right click on the folder with the “?” and select “Find Missing Folder”. Then navigate to and select the folder on disk using the Finder/Explorer window that pops up
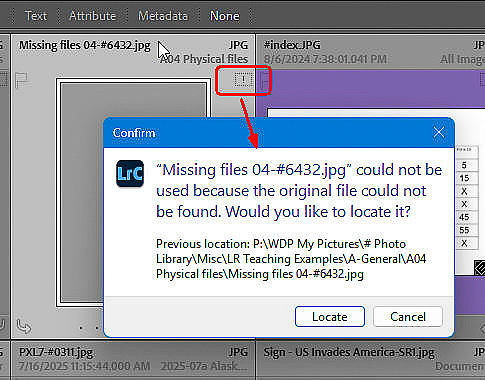
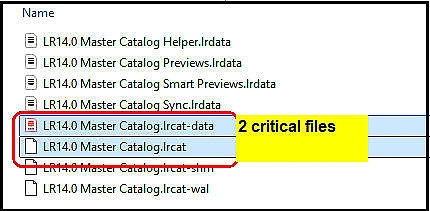
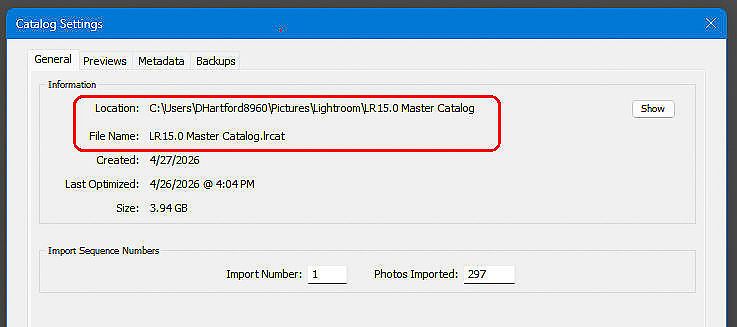
If an image goes missing, you will see a black “!” in the grid. Click on it and select the “Locate” button. Then in the popup navigate to that image wherever it is now and select it. See https://www.lightroomqueen.com/lightroom-photos-missing-fix/ for more information. 4 - Location of CatalogThe LrC catalog is a file whose name is the name of the catalog and with a file type (extension) of “.lrcat”. In the same folder as this file are a varying number of other files/folders that come and go all of which start with the catalog name and which have various extensions. This entire collection of associated files and folders are all used by LrC during normal operations and can be considered as part of the catalog. Of this set, the only two that are critical (meaning that LrC has no way to re-create them if they become missing or unusable) these are the “.lrcat” file and the file/folder with file type “.lrcat-data”. All the others are helper type files and folders which LrC can rebuild as necessary if they go missing.
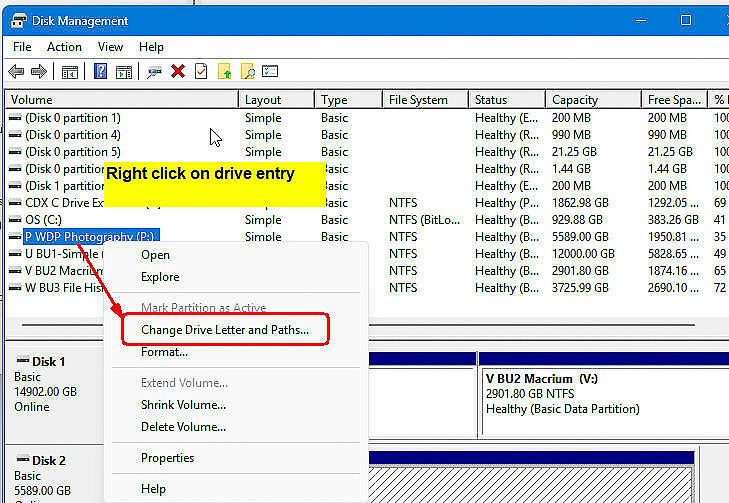
5 - Drive Letter Change (Windows)Mac computers identify disk drives by name but Windows computers identify them by Drive Letter. Changing the Drive name (Mac) or Drive letter (Windows) renders all the images on the that drive which are known to LrC as “missing” in LrC. To remedy this relink the top level folders as described above. For Windows users, a problem is that drive letters are not kept on the drive itself like drive or volume names are for Mac’s. Rather when Windows starts up, or a new drive is plugged in, the Windows operating system assigns the next available letter in the alphabet to that drive. It starts with the boot drive which gets “C”, followed by any other internal drives and then goes on to the external (USB) drives in whatever order it happens to notice them. If the computer is already running and you plug in a new drive it gets the lowest unused letter past “C”. When your images are on your “C:” drive this is not a problem. However, in this day and age we have cameras with large sensors, we use massive SD cards, we do a lot of burst mode shooting, and we shoot in RAW format which produces lots of very large image files. This combination of factors gobbles up disk space pretty fast and it is quite common to run out of space on the C: drive at which point we transfer those image files to an external hard drive which has a different letter. As you recall the location of image files is kept in the catalog for each image. On Mac’s this starts with the drive name and on Windows this starts with the drive letter. Unfortunately, for external drives, the drive letter may change when you re-boot your computer or eject and re-plug in such a drive. When this happens, everything on that drive instantly becomes missing in LrC. To avoid this problem, use Windows Disk Manager to lock in a drive letter for your external drive (use a letter in the 2nd half of the alphabet such as “P”) so it doesn’t change anymore when used on that computer. Once the drive has a permanent letter, you will need to re-link the folders one time as described here: https://www.lightroomqueen.com/lightroom-photos-missing-fix/.
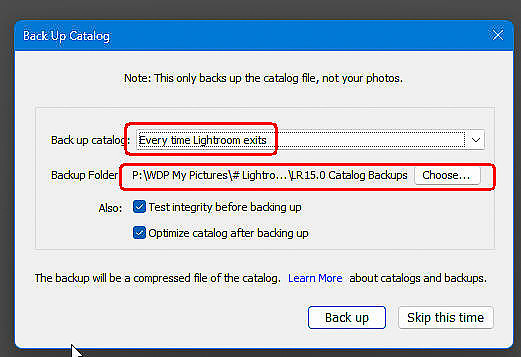
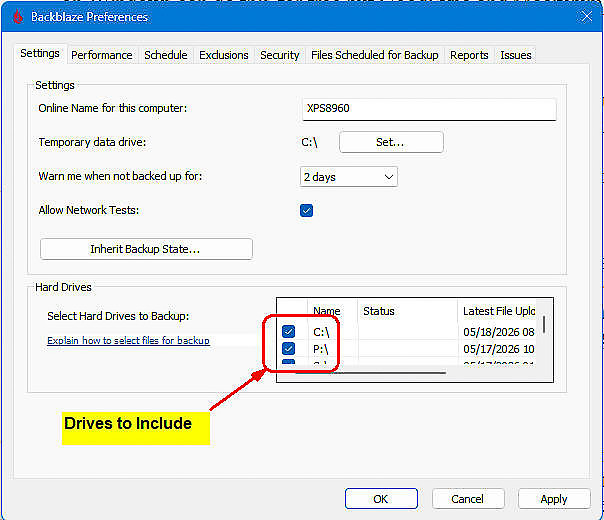
6 - BackUpsHaving backups is critical. Don’t fall into the “it will never happen to me” trap or the “I’ll deal with backups later after I finish with xyz”. If you don’t already have robust (and tested) backup systems for your computer you need to. If you do have one, periodically you need to assure that recent changes are reflected in the backup sets. This is not just for Lightroom and your photography, this is for everything on your computer but in this article I’m focusing on LrC related folders and files. For a more complete run down on this topic see LR/Classic Files To Backup and Restore DO NOT delude yourself into thinking that cloud based file sharing systems such as OneDrive, Google Drive, Dropbox, and iCloud are backup systems – while they may be useful they are not backup tools. The two critical things that you need to protect with backups are the LrC Catalog and your images. BUILT-IN CATALOG BACK UP
ADDITIONAL BACK UPS
LOCAL
REMOTE
7 - Images must be imported firstWhat you see in the folders panel in LrC are ONLY folders that contain images which have been imported into LrC (and some level of their parent folders). Other folders on your system are not shown even if they are subfolders of shown folders. Similarly, images you see in the filmstrip and grid are only those which have been imported into LrC.
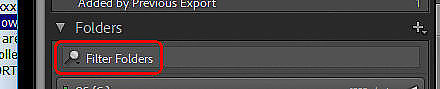
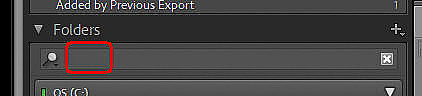
8 - Folders not showing in Folders PanelMany times users complain that folders containing images that they are absolutely sure are in the catalog are not being shown in the folders Panel. The main cause of this is not realizing that you have a folder filter set. Take a look at the line immediately under the Folders panel header which has a magnifying glass icon. This is the filter for what folders show up in the Folders Panel. To see all the folders, it should say “Filter Folders” which means the filter is off.
If it says anything else then only folders that have that text will show. But here’s where people get tripped up. If that field has a “blank” in it (i.e. you accidentally typed a space character in the filter field), it looks perfectly normal but you see no folders.
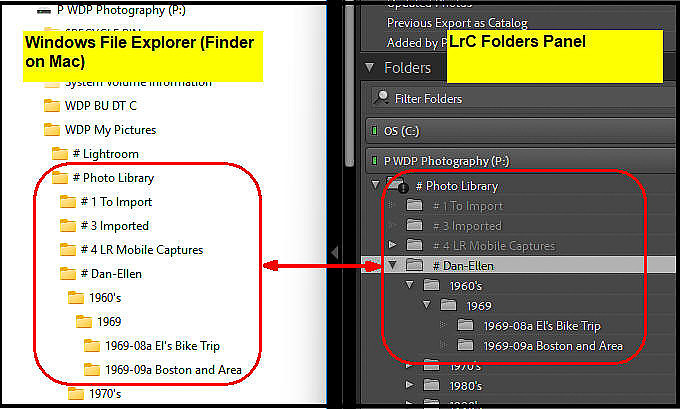
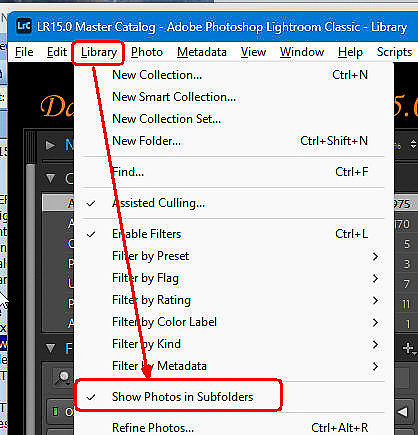
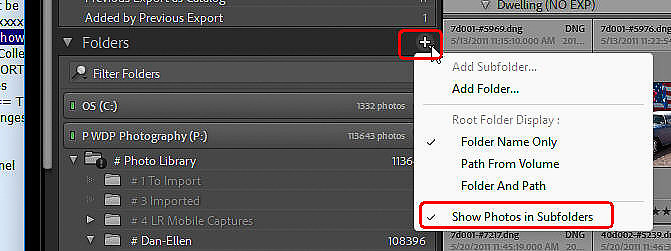
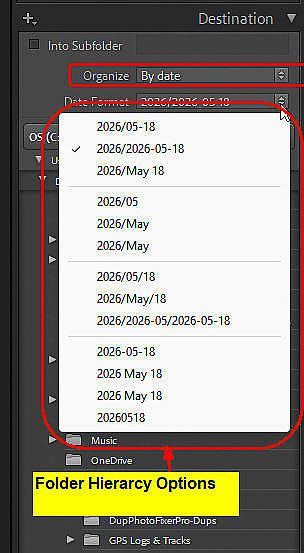
Here’s why. A “space” character in LrC filters are used as a delimiter. In this filter it acts like an “or” between strings of character. For example “New York” in the filter would show folders that had the characters “New ” or the characters “York” in the folder name. So a filter of just a “blank” would show no folders as it would be treated as a desire to show folders that have a folder name of {blank} or {blank} and folders in Macs and Windows can’t have no folder name. So, nothing shows up. 9 - Image counts are wrong in Folder PanelThe main cause of this is the “Show Photos in Sub-Folders” setting. This toggle can be found on the “Library” menu Or by right clicking the “+.” symbol at the right end of the “Folders Panel” header When this is selected (checked), the count of images on a parent folder INCLUDES images in all subfolders of that parent. In addition, if a parent folder is selected, the grid/filmstrip show images in that parent folder plus all the images in all subfolders of that parent. When this is not selected (un-checked), the count of images on a parent folder DOES NOT INCLUDE images in subfolders of that parent. In addition the grid/filmstrip does not include images contained in the sub-folders. 10 - Folders and CollectionsMany new users are confused about the difference between folders and collections in LrC. Folder Every image known to LrC MUST be in exactly 1 folder – no more, no less. When you import an image into LrC it will show up in a folder in the Folders Panel. There is no other option. The hierarchy of folders on each drive or volume you see in the Folders Panel should mirror what you see in Mac Finder or Windows File Explorer but is displayed from what is kept in the catalog. Remember, the actual physical image exists in your computer file system (not inside of LrC). If the physical reality on disk has changed by something outside of LrC since the image was imported then those Folders shown in the LrC folders panel will no longer match what is physically on disk and those folders will be marked as ‘missing” (“?” on folder icon). LrC can automatically create folders for you (based on capture time of photos) when you import images or you can manage your own folders. One common mistake is to base your folders on subject such as “Family”, “Travel”, “Nature”. The problem with this is that it may be ambiguous as to what folder an image belongs in. For example, a photo of your kids, during a vacation, in front of Yosemite Falls. Does that photo go into the “Family”, “Travel”, or “Nature” folder? However a folder called “2025-02 Yosemite Trip” or folder “2025-02-15” is unambiguous. For things like “Family”, “Vacations”, “Nature”, “Waterfall”, etc. it is best to use Collections and/or Keywords and leave Folders in a chronological structure (either managed by LrC or by yourself). Collections Whereas Folders are mandatory, Collections are optional. A collection is a named group of images. Any one image can be put in any number of collections and any collection can contain any number of images from different folders Putting images in collections does not create a new copy of the image, it just allows you to see and work on a set of images that in your mind have something in common. Under the covers, a collection is just a named list of images. Looking at and operating on images through a collection is the same as looking at and operating on those same images through a Folder. If you do something to an image while looking at it through a folder, those changes instantly appear in all collections that image participates in. Similarly, if you do something to an image while looking at it through a collection, whatever you do is instantly reflected in all other collections that image participates in as well as the folder it is in. Whether or not you choose to use collections, deciding how to organize your folders is quite important to a happy life with LrC. It is important that you pick a strategy and then stick to it. You basically have two choices with many flavors.
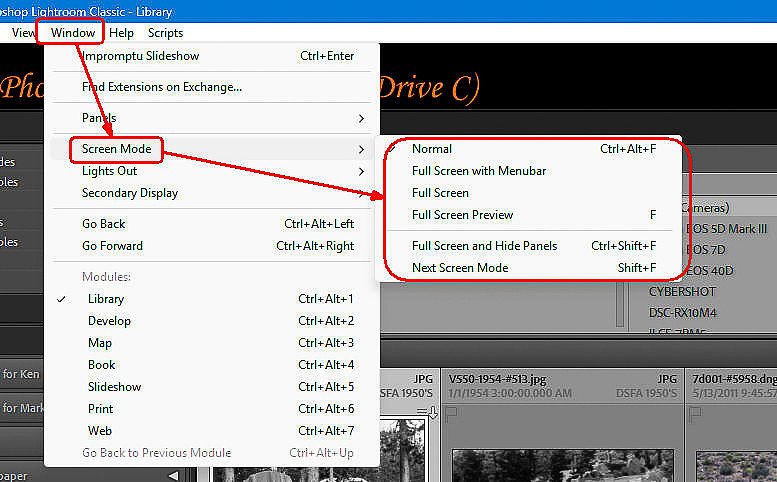
For more details about Folders and Collections, and the two choices for folder structures see: Folders vs. Collections vs. Keywords 11 - Screen modesA common complaint is the disappearance of the Operating System supplied title bar and/or the LrC menu bar at the top of the interface. This is almost always caused by the user thinking they were in a text field and typing the letter “f” which is a KBSC (Keyboard Shortcut / Speed Key) used to change the full screen display mode. When this happens it is very frustrating that you can no longer get to the maximize, minimize, close app icons or sometimes even to the LrC menu bar. Below is information about the various screen modes. However, the take-home message here is that if you are missing the title bar or LrC Menu bar, click “f” on your keyboard to toggle back to the prior screen mode or <Shift>+f to rotate through the screen modes till you get to the one you want. There are 5 screen modes. You can set them through menu “Window -> Screen Mode” or in some cases (as shown in the screen shot) through the use of a KBSC. Screen modes: Normal
Full Screen with Menubar
Full Screen
Full Screen Preview
Full Screen and Hide Panels
KBSC notes:
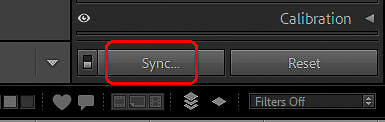
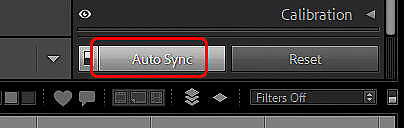
12 - Auto-SyncAuto-Sync is many times quite handy (and some people keep it on all the time) but it is also considered by many (including myself) as the most dangerous tool in LrC. In the Develop Module, your edits are normally ONLY applied to the single active (most selected) image. If you turn on “Auto-Sync” then whatever you do is applied to all selected images. Where folks get into trouble is forgetting to turn off Auto-Sync. Then days, weeks, or months later (even after exiting and re-launching LrC), you realize that it has been on all that time and every edit you did to the image you were looking at was mistakenly being applied to all the selected images. This is when the extent of your vocabulary is exercised as there is no practical way to undo all of that short of reverting to a backup catalog. If you catch it before you exit LrC you can keep executing the “Un-Do” command (<Ctrl+Z> Win, <Cmd+Z Mac) till the you get back to where you should have turned it off, but if you’ve shut down LrC, that option is not available. Auto-Sync OFF Auto-Sync ON 13 - Scope of changesMany commands such as setting a star rating, adding a keyword, adding a title or caption, or for that matter changing any metadata field, can operate on all selected images or just the single active (most selected) image depending on where you are when you issue the command and for changes applied through the Metadata pane, a setting in that panel. Changes made outside the Metadata Panel
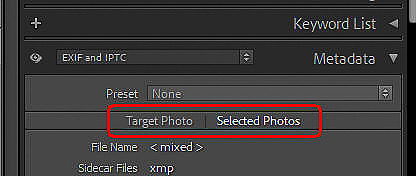
Changes made in the Metadata Panel The Metadata Panel has two modes which are easy to miss.
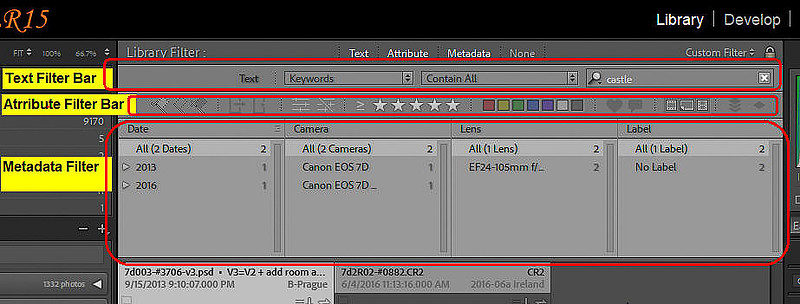
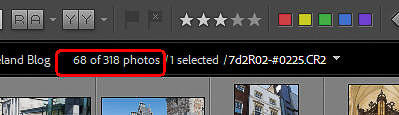
Target Photo: if “Target Photo” is selected the data shown in the panel is only for the single active photo (no matter how many are selected) and any changes made will be applied to only this one photo. Selected Photos: If “Selected Photos” is selected, then the data in the panel is for all selected images and any changes will be applied to all selected images. In the case were a metadata field has different values in different images it will say “<mixed>”. 14 - FiltersUse of filters can trip up new users. Don’t get me wrong, filters are wonderful but they do have a couple of things to be aware of.
15 – Don’t Re-importFrom time to time you may discover that some folders are missing or some images are missing. Many times the reflexive action is to ‘just re-import’ the problematic images. If you believe that you had already imported a bunch of images and they are not there now, DO NOT just re-import them as many times this causes more issues. Rather, figure out what happened. Start by writing down as much as you can recall about what you were doing when things went missing or what you’ve done since you last saw those things present in LrC. Or, at least when those now missing things were last seen in LrC. This would be a good time to take a deep breath, try to figure out what happened and if needed get some help.
Sometimes the suggested solution turns out to be to re-import images but this is a last resort. In most cases re-importing is not the answer and re-importing causes more problems than it fixes. If you don’t know what happened, you won’t know the best way to fix it so figure it out or get a hold of someone you trust who can figure it out. Final CommentYou’ve made it to the end of this detailed article. I hope you found it informative and useful and that it addressed whatever it was that led you here. If you’ve stumbled upon any errors, omissions, or things that could be presented better, please let me know by leaving a comment. You may have noticed as you read through this article that you were not required to logon or to create an account. I did not ask for a credit card number. You did not have to provide an email address or phone number. You were not bombarded with pop up ads. I did not lure you part way into the article and then tell you to pay for a subscription to get the rest. Nobody paid me to write this article. I have no sponsors. I have no advertisers. I spend many hours (days. weeks or months) researching, testing, and writing articles such as this one to help folks such as yourself and to attract people to my web site where they may be inclined to utilize my one-on-one Lightroom Classic Training or Lighroom Help consulting services. So, I am going to ask you for a favor. Please spend a few minutes and leave a thoughtful comment. That’s it! If you feel especially motivated also post a review on Google and/or Yelp for “Dan Hartford Photo”. Free to you, very helpful to me. To leave a comment without having to register, send it to me via the "Contact+About" menu and I'll post it for you (include the blog number or name).
Keywords:
danlrblog,
Drive Letter Change (Windows),
Folders not showing in LrC Folders Panel,
Image counts are wrong in Folder Panel,
Images must be imported into LrC first,
Lightroom,
lightroom classic,
Lightroom vs. Lightroom Classic,
Location of LrC Catalog,
LrC,
LrC Auto-Sync,
LrC BackUps,
LrC does not contain my images,
LrC Don't Re-import,
LrC Filters,
LrC Folders and Collections,
LrC Scope of changes,
LrC Screen modes,
New users,
Understanding the LrC Catalog
Comments
Greg(non-registered)
Thanks for this article. Setting up LrC right now and don't want to have to do it over.
KennyP(non-registered)
Great explanation of LrC. Condensed and concise. I believe this will be of help for many types of photographers. Thanks for sharing your time and expertise.
Matt O(non-registered)
I have just read your complete article … well done. Such a wide topic and to condense to 15 well documented scenarios is superb.
I will also bookmark for future reference. Thanks for all your efforts and knowledge shared so generously.
No comments posted.
Loading...
|