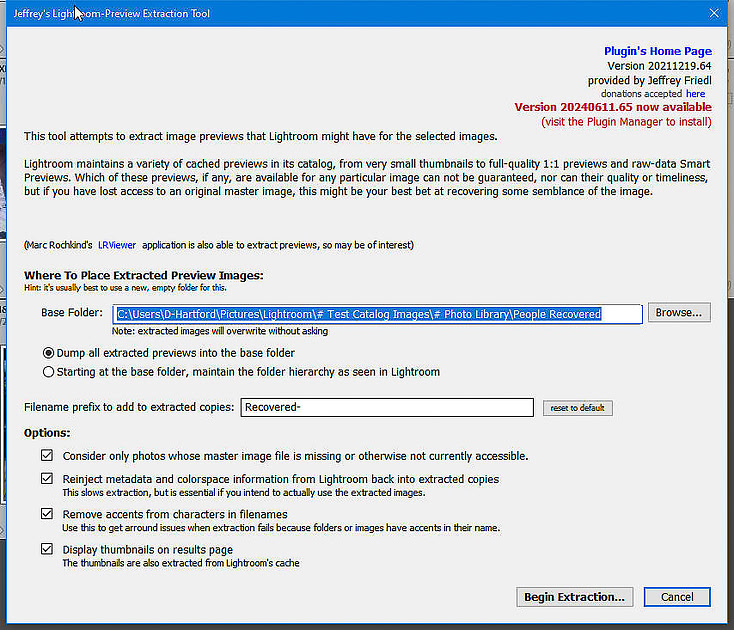
LR023 - Generate JPG's from LrC PreviewsHow to generate JPG’s from LrC PreviewsWritten July 2024 Updated August 16, 2025 Even with all the best intentions and robust backup processes in place, sometimes things can still go sideways. When images are shown as ‘missing’ in LrC, that is usually just a pointer problem and those images (or folders) just have to be re-linked in the LrC catalog. But, sometimes the missing images are indeed not present on any of your disk drives or backups and are also not in any cloud service or photo sharing website from which they can be downloaded. A user in one of the LrC Help forums I monitor had just such a case today. A number of months ago they imported a bunch of images from a memory card using a card reader. I assume their OS saw that card reader as a regular disk drive and thus allowed the import mode to be “Add” rather than forcing it to be one of the “Copy” options. The result was that the LrC catalog was pointing to the memory card in the card reader as the official source of the image. And, you guessed it, the user formatted and reused the card several times before noticing the problem. It is also not surprising that there are no backups as almost no one takes backups of memory cards as a general rule. Yes, I know many cameras with 2 slots can do this when shooting but that's only as good as how long you keep those cards without over writing the images. Rather they import or copy the contents of memory cards to local disk drives and then let their normal backup routines make extra copies. That’s what this user assumed was happening. So, what is one to do when this happens? If, after exhausting all possible other places those images may be (Time Machine, File History, local backups, cloud backups, photo sharing web sites, Adobe Cloud, etc.), it may come down to them ONLY being available as previews in LrC. WHATEVER YOU DO, DO NOT REMOVE THE IMAGES FROM LrC. What you need to do is to create JPG’s from those LrC Previews. I’m sure there are other tools, but below are two tools that can do this. It should be noted that the resolution (pixel dimensions) will only be as good as the size of the previews you have available. Extract JPG’s from Previews (JFriedl plug in)This plug in from Jfriedl ( http://regex.info/blog/lightroom-goodies/preview-extraction ) is a good tool and the one I recommend. NOTE: Jfriedl’s website is having issues with the Chrome browser which at the time of this writing won’t let you use “http:// “as it automatically changes it to “https://” producing a page not found error. Use FireFox, Edge, or Safari instead if you hit this problem. Unlike the Adobe script (below) this plug in:
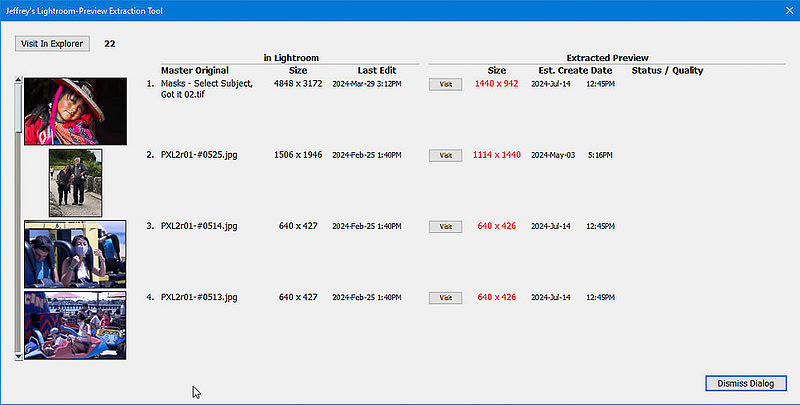
How it WorksRegular previews are just small JPG’s with your edits baked into the pixels. Smart Previews are a special kind of highly compressed, lossy, DNG file that can be used for editing. If you don’t have a Smart Preview or you have a regular preview with more than 2580 pixels on the long edge, then the plugin will use the regular preview (even if a Smart Preview is available). The extracted image will be a JPG file with your edits baked into the image pixels. The pixel dimensions of the JPG will be the size from the largest LrC generated preview available. It will contain the metadata from the image as seen in the metadata panel but no information pertaining to prior edits. If you re-import this image, you can apply new edits but your starting point is the edited pixel values from the preview. A Smart Preview is a DNG file with up to 2580 pixels on the long edge. If you have Smart Previews, they will produce a higher quality result than all but 1:1 previews (up to 2580 pixels on the long edge). A Smart Preview contains the pixels of the original image (as imported) as well as the XMP metadata including the current value for each edit that had been made to the image. If you re-import one of these you will be able to change most of your edits. You won’t have the prior edit history in the history panel but you will have the original (as originally imported) pixel values along with the last value for each adjustment that had been made. It should be noted, that around version LrC 12 or 13 when an LrC original image is synced to the LR/Cloud, the automatically generated Smart Preview which LrC sends to the cloud is also saved as a regular Smart Preview in LrC. Let me explain the difference in how edits are handled with an example. Let’s say before running the plugin, you slammed the exposure slider all the way to the right making all the pixels in the image pure white (RGB values of 255, 255, 255). Then if you re-import the extracted image it will be all white on the screen. If the plugin used a Smart Preview, you could move the exposure slider to the left and get back the prior detail. However, if the plugin used a regular preview, the pure white is now the starting point for the image and moving the exposure slider to the left will not bring back any of the original image, it will just change the pure white to some shade of pure gray. Here are the steps…..
When complete you can then import the recovered images into your LrC catalog. Depending on your particular situation, you may want to:
Extract JPG’s from Previews (Adobe Script)A second way to recover JPG’s from Previews is to use a script provided by Adobe. While quite functional, it is not as comprehensive as the plugin discussed above. https://helpx.adobe.com/lightroom/kb/extract-previews-for-lost-images-lightroom.html The script extracts previews for all the images that are selected at the time you run the script. It extracts poster frames for any video clips that are selected at the time. You can choose a location for these files. The previews are in JPEG format, and the name contains the size of the image (for example, _MG_0233-360x240.jpg). The Above link has a button to download the script as well as step by step instructions Note:
Keywords:
Convert Previews to JPG's,
danlrblog,
lightroom,
lightroom classic,
Lrc,
LrC Previews,
Missing Folders,
Missing Images,
Previews,
Recover using Previews
Comments
No comments posted.
Loading...
|